![]()
| Please Note: This pattern is intended for use by beaders who already have a basic understanding of techniques used in the art of French Flower Beading. |
| The writing of this pattern is "in process" and not complete. | |||||
| Beads: Approximately 46" of
Size 11/o seed beads (35" for the 3 petals and
11" for the stem.) Wire: 24 gauge. For multicolored petals, cut three 26"-30" pieces (or more... whatever you're comfortable with!). Using 28 gauge wire resulted in a shamrock a little too delicate/frail for perhaps a coat or heavy sweater. For stem wrapping, 28g is good for tugging firmly and flexibility in wrapping. |
|||||
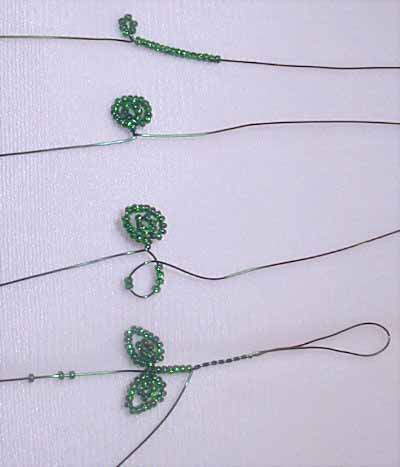 |
1.
Make a 6-bead loop approximately 4
inches from the end of your cut or spool wire. 2. Make a 16-bead wraparound loop around the 6-bead loop. |
||||
| 3.
Make another 6-bead loop and
16-bead wraparound loop directly opposite the first one. 4. Shape wraparound loops by squashing them slightly and pointing them upwards (towards 2 o'clock). |
|||||
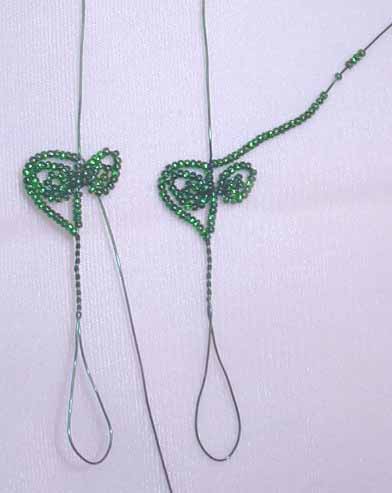
| 5.
Thread (or slide up from spool) 6 beads to form bottom of
Basic and then form Basic loop. Note: If final piece will have a 2 color beaded stem, Bring together 4 inches of wire to create the Basic loop (resulting in 1/2 inch twisted wire and 1.5 inch long loop). Individual work/results may vary so measure what you do for each petal so you can tailor the pattern to your needs. Perhaps you like a longer or shorter stem for the final shape your shamrocks take. 6. Add three beads to top of Basic. |
|||||
 |
|||||
| 7. Make 6 rows
VT*, PB When wrapping rows around the top of the basic in a reVerse point*, grip feedwire & beads firmly, keeping in mind that the direction in which you lead the beads and crimp the wire will determine the final shape of your beadwork. In the first example just above, note the direction of the feedwire as a final tug is made after the wrap and before Row 2 (from 12 to 5 o'clock) * V = Vpoint. Point made in reVerse...think cleaVage. Tip: in making a larger size Vpoint with more rows, try lacing vertically one bead before the Basic. |
Hold petal,
feedwire & basic firmly in place with one hand and
with the other hand, push new beads snugly against basic
wire and swing wire up to the 1 or 2 o'clock position
before continuing around the outside of the wraparound
loop to form Row 2. These first two rows are the difficult/frustrating part of the petal ~ to get the "V" shaped correctly. It may take a couple tries to get the hang of it (similar to the feeling we all have when we make our first petals). |
||||
| 8. Stem Notes: in the
finishing of each petal, wrap feedwire around Basic a
couple times before snipping from spool. Snip to same
length as other basic wires/loops. Twist all three wires together from petal (not too tightly as these will be twisted yet again in the next step ~ we don't want to overstress the wire and have it possibly break). Tip: I like to keep one loop (of the three) unsnipped if i will be using two colors to wrap the stem. The loop serves as an anchor through which one can pull tight the stem wrapping wire (see below). |
|||||
| Make 3 petals. | |||||
 |
9. Assemble
shamrock by twisting all three petal stems together (nine
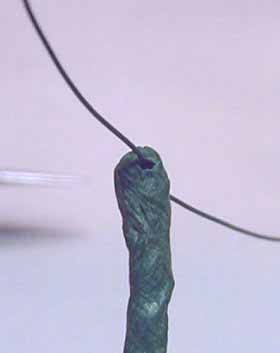
wires). 10. Trim to approximately 1.5" 11. Wrap with Floral Tape. 12. If doing a one color stem, wrap a couple inches of 28g (or thinner) wire around stem and tack it down with a bit of floral tape. If doing a two color stem, poke a tiny hole through the floral tape which is covering the end of the stem. Thread appox 24" of wire and center it. |
||||
 |
|||||
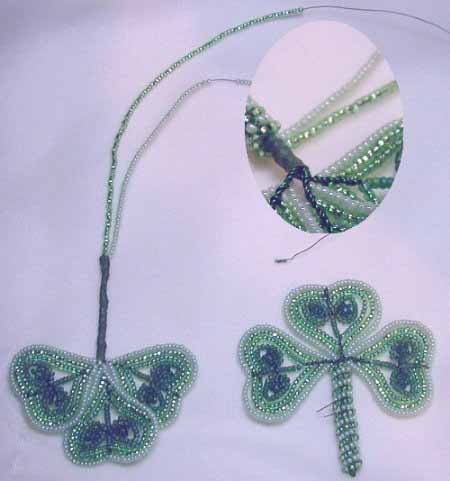
| 14. Single Color
- String approximately 11.5-12" of beads onto wire.
Two Colors - string approximately 5.5" of beads onto
each half of wire. Crimp wire ends. 15. Bring wires together and hold together as one and wrap stem. It helps to hold the wires together out to the side and with the other hand, roll the stem into the beads held taught. |
16. Snip crimped ends and release extra beads. Wrap wire in between petal bases a couple times and then work wire back down stem part way in between bead rows. Finishing with wire positioned at back of stem, snip wire closely and bury exposed wire tip between beads. This will be covered and cemented down when barpin is attached. | ||||
![]()
| Back to Boa's Botanicals |